Interfacing Small Microphone Sound Detection Sensor Module with Arduino
Small Microphone Sound Detection Sensor Module
A Small Microphone Sound Detection Sensor Module is used to detect sound levels in the environment. It converts sound waves into electrical signals and is commonly used in security systems, automation, and interactive projects.
Working Principle of Sound Detection Sensor
The Sound Detection Sensor Module consists of a microphone that captures sound waves and converts them into an analog or digital signal. The module amplifies the signal and processes it to determine the presence or intensity of sound.
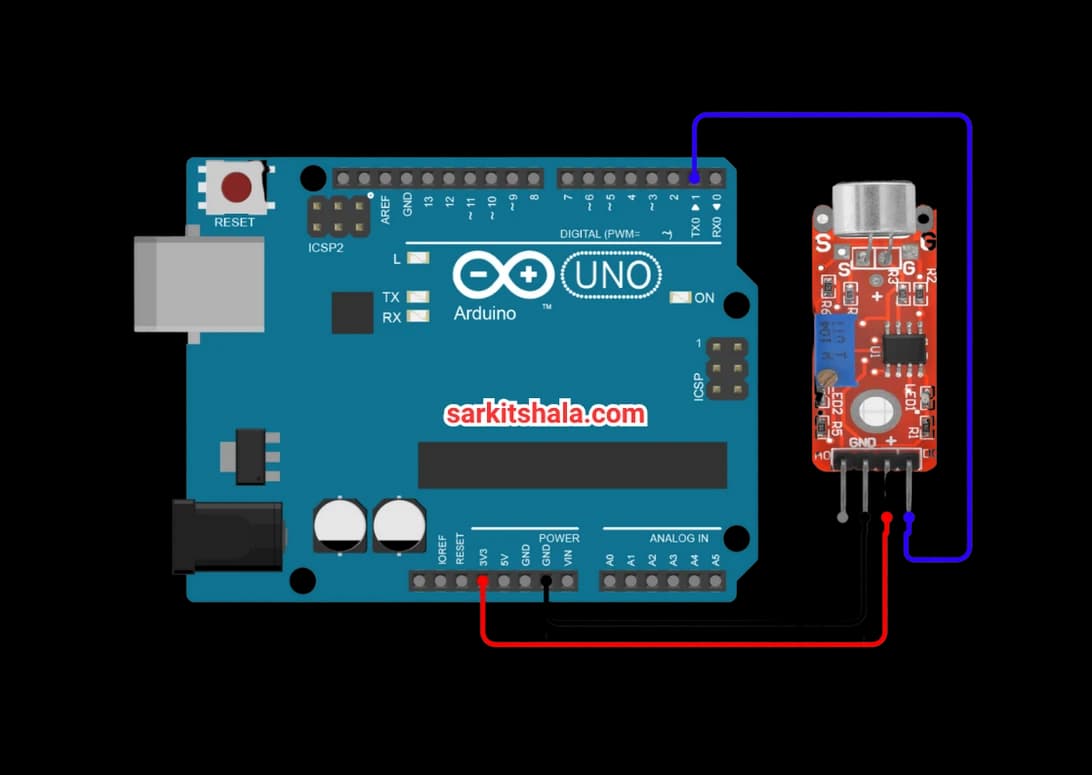
Wiring the Sound Detection Sensor to Arduino
To connect the Sound Detection Sensor Module to Arduino, connect the VCC and GND pins to +5V and GND on the Arduino. The A0 pin is connected to an analog input pin for continuous monitoring, while the D0 pin is connected to a digital input pin for threshold-based detection.
Types of Sound Detection Sensors
Analog Sound Sensor
- Captures sound waves via a microphone.
- Amplifies the signal and converts it to an analog output.
- Arduino reads the signal for real-time sound level monitoring.
Digital Sound Sensor
- Captures sound and processes the signal.
- Compares the intensity to a predefined threshold.
- Outputs a digital HIGH or LOW signal accordingly.
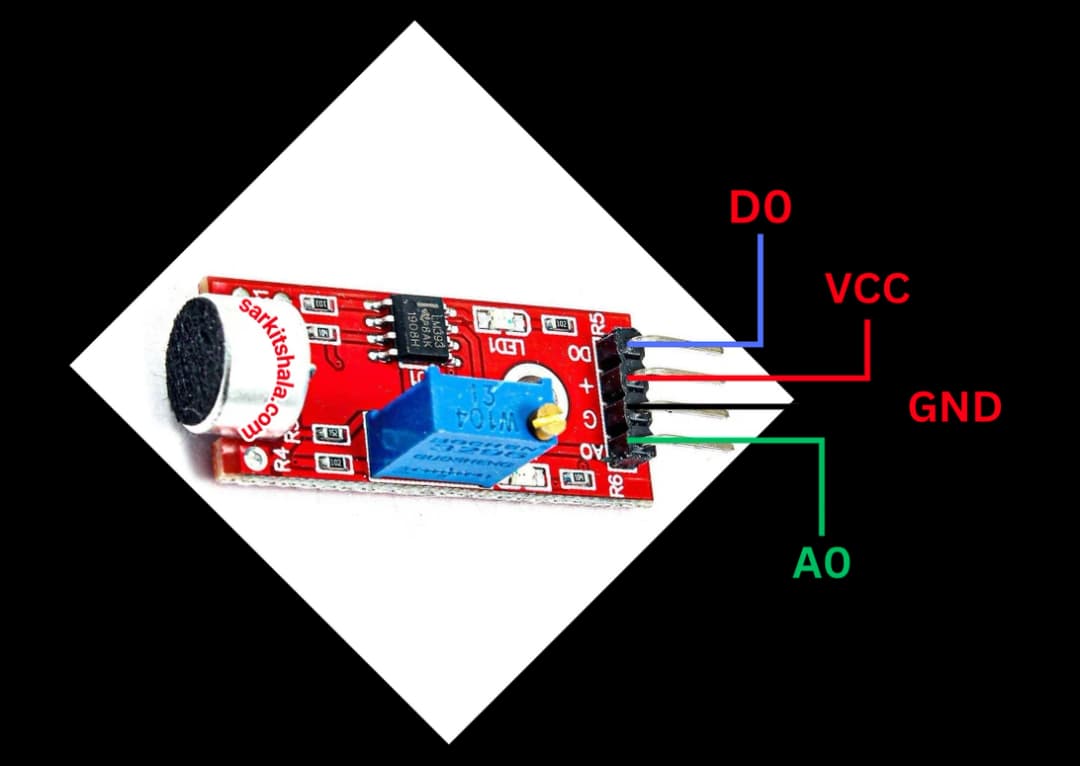
Pin Configuration of Sound Detection Sensor
Small Microphone Sound Detection Sensor
- VCC: Connect to +5V on Arduino.
- GND: Connect to GND on Arduino.
- A0 (Analog Out): Connect to an analog input pin (A0).
- D0 (Digital Out): Connect to a digital input pin (D2).
Algorithm
Initialize Components
- Connect the VCC and GND pins of the Sound Detection Sensor to +5V and GND on the Arduino.
- Connect the A0 pin to an analog input (A0) and the D0 pin to a digital input (D2).
Write the Code
- Set the sensor pins as INPUT in the setup() function.
- Read the analog and digital values in the loop() function.
- Use these values to determine sound intensity or trigger an action.
Display Values or Control Devices
- Print the sensor readings to the serial monitor.
- Use the readings to trigger devices like LEDs or buzzers based on sound levels.
Test the Project
- Upload the code to the Arduino.
- Test the sensor by making sounds and observing the readings.
Arduino Code
1// Sound Sensor connected to digital pin 2
2const int soundSensor = 2;
3const int ledPin = 13;      // Built-in LED
4
5void setup() {
6  pinMode(soundSensor, INPUT);
7  pinMode(ledPin, OUTPUT);
8  Serial.begin(9600);
9  Serial.println("Sound Sensor Ready...");
10}
11
12void loop() {
13  int sensorValue = digitalRead(soundSensor);
14
15  if (sensorValue == HIGH) {
16    Serial.println("Sound Detected!");
17    digitalWrite(ledPin, HIGH);  // Turn on LED
18    delay(200);                  // Debounce
19  } else {
20    digitalWrite(ledPin, LOW);   // Turn off LED
21  }
22}
23
Applications
- Noise level monitoring
- Security alarm systems
- Clap-activated switches
- Voice-controlled automation
- Smart home systems
- Interactive sound-based projects
Conclusion
Interfacing a Small Microphone Sound Detection Sensor Module with Arduino enables sound-based automation and monitoring. These sensors are useful in noise detection, security systems, and interactive projects. With simple wiring and coding, you can integrate sound sensing into your applications effortlessly.