Interfacing DTMF Module with Arduino
DTMF (Dual Tone Multi-Frequency) Module
The DTMF module allows an Arduino to receive and decode audio signals from a phone's keypad. Each key press on a phone generates a unique frequency combination (dual tone) that the DTMF decoder converts into digital signals. This system is widely used in remote control applications, home automation, and security systems.
Types of DTMF Modules
A DTMF module works by decoding the unique audio frequencies produced when keys are pressed on a phone. These frequencies are a combination of two tones – one from a high group and another from a low group. The DTMF decoder (like MT8870) detects these signals and converts them into a 4-bit binary code, which is sent to the Arduino. By reading this output, the Arduino can identify which key was pressed. This process enables remote control of devices using phone signals, allowing long-range automation and communication.
How Does a DTMF Module Work
Explanation of Code
The code utilizes the DTMF module's 4-bit digital output to identify pressed phone keys. By monitoring the digital pin connected to the DTMF module, the Arduino reads and decodes the keypress in real time. Each key press corresponds to a unique frequency pair (DTMF tones), which the module decodes and sends to the Arduino. This system allows remote control of appliances by assigning keypress actions. For instance, pressing '1' may turn on a light, while '0' may turn it off. This makes it ideal for phone-based control applications.
Applications of DTMF Modules
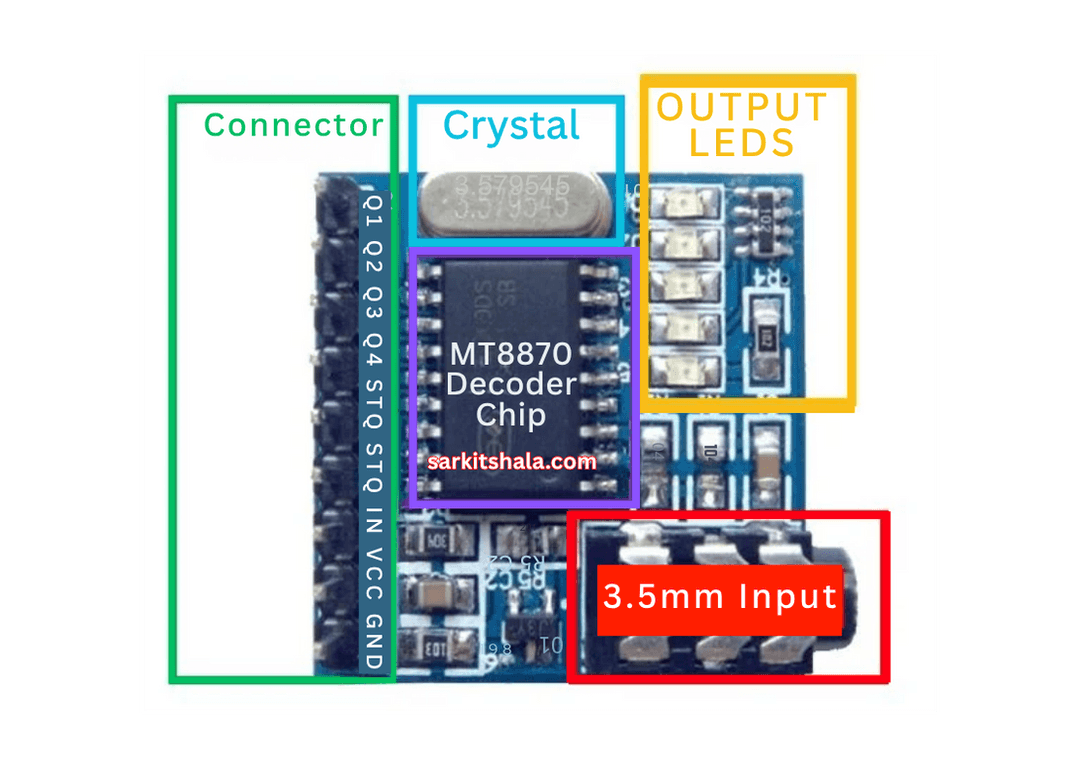
Arrangement
1: VCC
2: GND
3: OUT (Digital Output)
4: IN (Audio Input)
Types of DTMF Modules
MT8870 DTMF Module
- Decodes DTMF signals from audio sources (e.g., mobile phones).
- Provides 4-bit digital output corresponding to the pressed key.
- Commonly used for security systems and remote control applications.
HT9170 DTMF Module
- Accurately detects and decodes DTMF signals.
- Compatible with microcontrollers like Arduino and Raspberry Pi.
- Ideal for advanced telecommunication and industrial control systems.
Pin Configuration of DTMF Module
Standard DTMF Configuration
- VCC: Connect to 5V on Arduino.
- GND: Connect to Arduino ground (GND).
- OUT: Connect to a digital input pin on Arduino.
- IN: Connect to the audio source (phone or audio jack).
Alternative DTMF Setup
- Use a 3.5mm audio jack to feed the audio input.
- Ensure GND from both devices is shared.
- Use an isolated power supply if noise interference occurs.
Components Required
- Arduino Uno (or compatible board)
- DTMF Decoder Module (e.g., MT8870)
- Mobile Phone or Audio Source
- 3.5mm Audio Jack (if needed)
- Connecting Wires
- Breadboard (optional)
Circuit Connections
DTMF Module to Arduino
- Connect VCC to Arduino 5V.
- Connect GND to Arduino ground.
- Connect OUT pin to Arduino digital pin 2.
- Connect IN pin to phone audio output (via 3.5mm jack or direct wire).
Advanced Setup with Isolation
- Use an optocoupler to isolate the audio input.
- Connect OUT pin to Arduino with a pull-down resistor.
- Ensure common GND is shared between devices.
Algorithm
Define the Pins
- Assign the DTMF OUT pin to a digital input pin on Arduino.
- Set up the input pin to read digital signals from the DTMF decoder.
Initialize the Arduino
- Configure the DTMF pin as an INPUT in the setup() function.
- Begin serial communication to monitor detected signals.
Read DTMF Signals
- Continuously check the DTMF pin for changes.
- Convert the 4-bit digital output into corresponding key values.
Process Input
- Map detected DTMF codes to specific actions (e.g., turning on a relay).
- Trigger device operations based on key presses.
Repeat the Process
- Continuously monitor the DTMF input to process new signals.
- Update device states in response to valid inputs.
Arduino Code
1// Arduino DTMF Interface: Control Devices via Phone Calls
2// This code reads tones from a DTMF module and prints the corresponding key
3
4#define DTMF_PIN A0  // Analog pin where DTMF OUT pin is connected
5
6void setup() {
7  Serial.begin(9600);
8  pinMode(DTMF_PIN, INPUT);
9  Serial.println(\"DTMF Module Ready - Dial a key from your phone\");
10}
11
12void loop() {
13  int dtmfValue = analogRead(DTMF_PIN); // Read analog value from DTMF module
14
15  if (dtmfValue > 100) { // Basic threshold to detect signal (adjust as needed)
16    char detectedKey = getDTMFKey(dtmfValue);
17    Serial.print(\"Detected Key: \");
18    Serial.println(detectedKey);
19
20    // Example: Trigger action on specific key
21    if (detectedKey == '1') {
22      Serial.println(\"Turning ON the light...\");
23    } else if (detectedKey == '2') {
24      Serial.println(\"Turning OFF the light...\");
25    }
26
27    delay(500); // Debounce delay
28  }
29}
30
31// Mock DTMF decoder function - replace with actual library or mapping
32char getDTMFKey(int analogValue) {
33  // This is a placeholder function. In real use, the DTMF module will output digital signals.
34  // You should connect to a DTMF decoder IC like MT8870 and read digital pins instead.
35  if (analogValue > 100 && analogValue < 200) return '1';
36  else if (analogValue >= 200 && analogValue < 300) return '2';
37  else if (analogValue >= 300 && analogValue < 400) return '3';
38  else return '*';
39}
Applications
- Remote Device Control via Phone
- Home Automation Systems
- Security Access Control
- Industrial Equipment Control
- Robotic Navigation via Phone Signals
- Telecommunication Systems
Conclusion
Interfacing a DTMF module with Arduino enables remote control using audio signals from a phone. The DTMF decoder converts these signals into digital outputs that the Arduino reads to trigger specific actions. This system is widely used in home automation, security access, and telecommunication projects. With simple wiring and code, you can build advanced control systems that respond to phone-based commands, enhancing remote operation capabilities.