Interfacing of LED with Arduino

1. LED (Light Emitting Diode)
It is a semiconductor device that emits light when an electric current passes through it. It is a special type of diode that converts electrical energy directly into light energy through a process called electroluminescence. LEDs are widely used in various applications, including display panels, indicator lights, lighting systems, and communication devices due to their high efficiency, low power consumption, and long lifespan.
2. How Does an LED Work?
2.1. Structure of an LED
An LED is made of a p-n junction semiconductor, similar to a regular diode. It consists of:
- P-type semiconductor (positive side) – Contains excess holes (positive charge carriers).
- N-type semiconductor (negative side) – Contains excess electrons (negative charge carriers).
When voltage is applied in the forward direction, electrons and holes recombine at the junction, releasing energy in the form of light (photons).
2.2. Working Principle of LED (Electroluminescence)
- Forward Bias Application: A voltage is applied across the LED terminals.
- Electron-Hole Recombination: Electrons and holes recombine at the junction, emitting photons (light).
- Emission of Light: The wavelength (color) depends on the bandgap of the semiconductor material.
- Fast Switching – Turns on and off instantly without warm-up time.
- Compact Size – Available in small sizes suitable for various applications.
- Durability – Resistant to shock and vibration compared to traditional bulbs.
- Eco-Friendly – LEDs do not contain harmful substances like mercury.
3. Semiconductor Materials and LED Colors
The color of an LED depends on the bandgap energy of the semiconductor material used. Different materials produce different wavelengths of light:
| LED Color | Semiconductor Material | Wavelength (nm) |
|---|---|---|
| Infrared (IR) | GaAs (Gallium Arsenide) | 850 - 940 nm |
| Red | GaAsP (Gallium Arsenide Phosphide) | 620 - 750 nm |
| Orange | GaAsP, GaP (Gallium Phosphide) | 590 - 620 nm |
| Yellow | GaAsP, GaP | 570 - 590 nm |
| Green | GaP, InGaN (Indium Gallium Nitride) | 495 - 570 nm |
| Blue | InGaN, SiC (Silicon Carbide) | 450 - 495 nm |
| White | Blue LED + Phosphor Coating | Mixed spectrum |
| Ultraviolet (UV) | GaN (Gallium Nitride) | 10 - 400 nm |
4. Characteristics of LEDs
- Low Power Consumption – LEDs consume very little energy, making them highly efficient.
- High Brightness – Modern LEDs provide bright illumination.
- Long Lifespan – Can last 50,000 hours or more.
- Fast Switching – Turns on and off instantly without warm-up time.
- Compact Size – Available in small sizes suitable for various applications.
- Durability – Resistant to shock and vibration compared to traditional bulbs.
- Eco-Friendly – LEDs do not contain harmful substances like mercury.
5. Types of LEDs
There are different types of LEDs, categorized based on their applications and construction:
Based on Construction:
- Through-Hole LEDs: Standard 3mm, 5mm, 10mm LEDs used in circuits.
- Surface Mount Device (SMD) LEDs: Used in compact electronics (e.g., mobile phones, TVs).
- Chip-on-Board (COB) LEDs: High-power LEDs with multiple chips for bright light output.
Based on Color & Functionality:
- Single-color LEDs: Emit one specific color (red, blue, green, etc.).
- RGB LEDs: Can produce multiple colors by mixing Red, Green, and Blue.
- Infrared (IR) LEDs: Used in remote controls and night vision cameras.
- Ultraviolet (UV) LEDs: Used in sterilization, counterfeit detection, and curing applications.
Based on Power Rating:
- Low-power LEDs: Used in indicators and displays.
- High-power LEDs: Used in lighting applications like streetlights and automotive headlights.
Applications of LEDs:
- Indicator Lights: Used in electronic devices (power indicators, alarms).
- Displays and Signage: Used in LED screens, billboards, and TVs.
- Automotive Lighting: Used in headlights, tail-lights, and dashboard indicators.
- Home and Office Lighting: Energy-efficient LED bulbs and tube lights.
- Streetlights & Industrial Lighting: Used for outdoor and commercial lighting.
- Medical Applications: Used in phototherapy, pulse oximeters, and endoscopy.
- Communication Systems: Used in optical fiber communication and remote controls.
6. Requirements
6.1 Hardware Components
- Arduino Board
- LED (5mm)
- Resistor (220Ω – 330Ω)
- Breadboard
- Jumper Wires
- USB Cable
6.2 Software Requirements
- Arduino IDE
- USB Drivers
- Arduino Board Support Package
7. Advantages of LEDs Over Traditional Lighting
| Feature | LED | Incandescent Bulb | CFL |
|---|---|---|---|
| Power Consumption | Low (1W – 10W) | High (40W – 100W) | Moderate (5W – 25W) |
| Lifespan | 50,000+ hours | 1,000 hours | 8,000 hours |
| Heat Emission | Very low | High | Moderate |
| Eco-Friendly | Yes (no toxic materials) | No (filament waste) | No (contains mercury) |
| Switching Time | Instant | Slow | Moderate |
8. Hardware Components
| Component | Quantity | Description |
|---|---|---|
| Arduino Board | 1 | Any model (Arduino Uno, Mega, Nano, etc.) |
| LED (5mm) | 1 | Any color (Red, Green, Blue, etc.) |
| Resistor (220Ω – 330Ω) | 1 | To limit current and protect the LED |
| Breadboard | 1 | For making easy connections |
| Jumper Wires | As needed | Male-to-Male wires for connections |
| USB Cable | 1 | To connect Arduino to a PC |
9. Software Requirements
| Software | Purpose |
|---|---|
| Arduino IDE | Writing and uploading code to Arduino |
| USB Drivers | Required for Arduino communication with PC |
| Arduino Board Support Package | Libraries and tools for programming the Arduino |
10. Circuit Diagram
LED Connection with Arduino
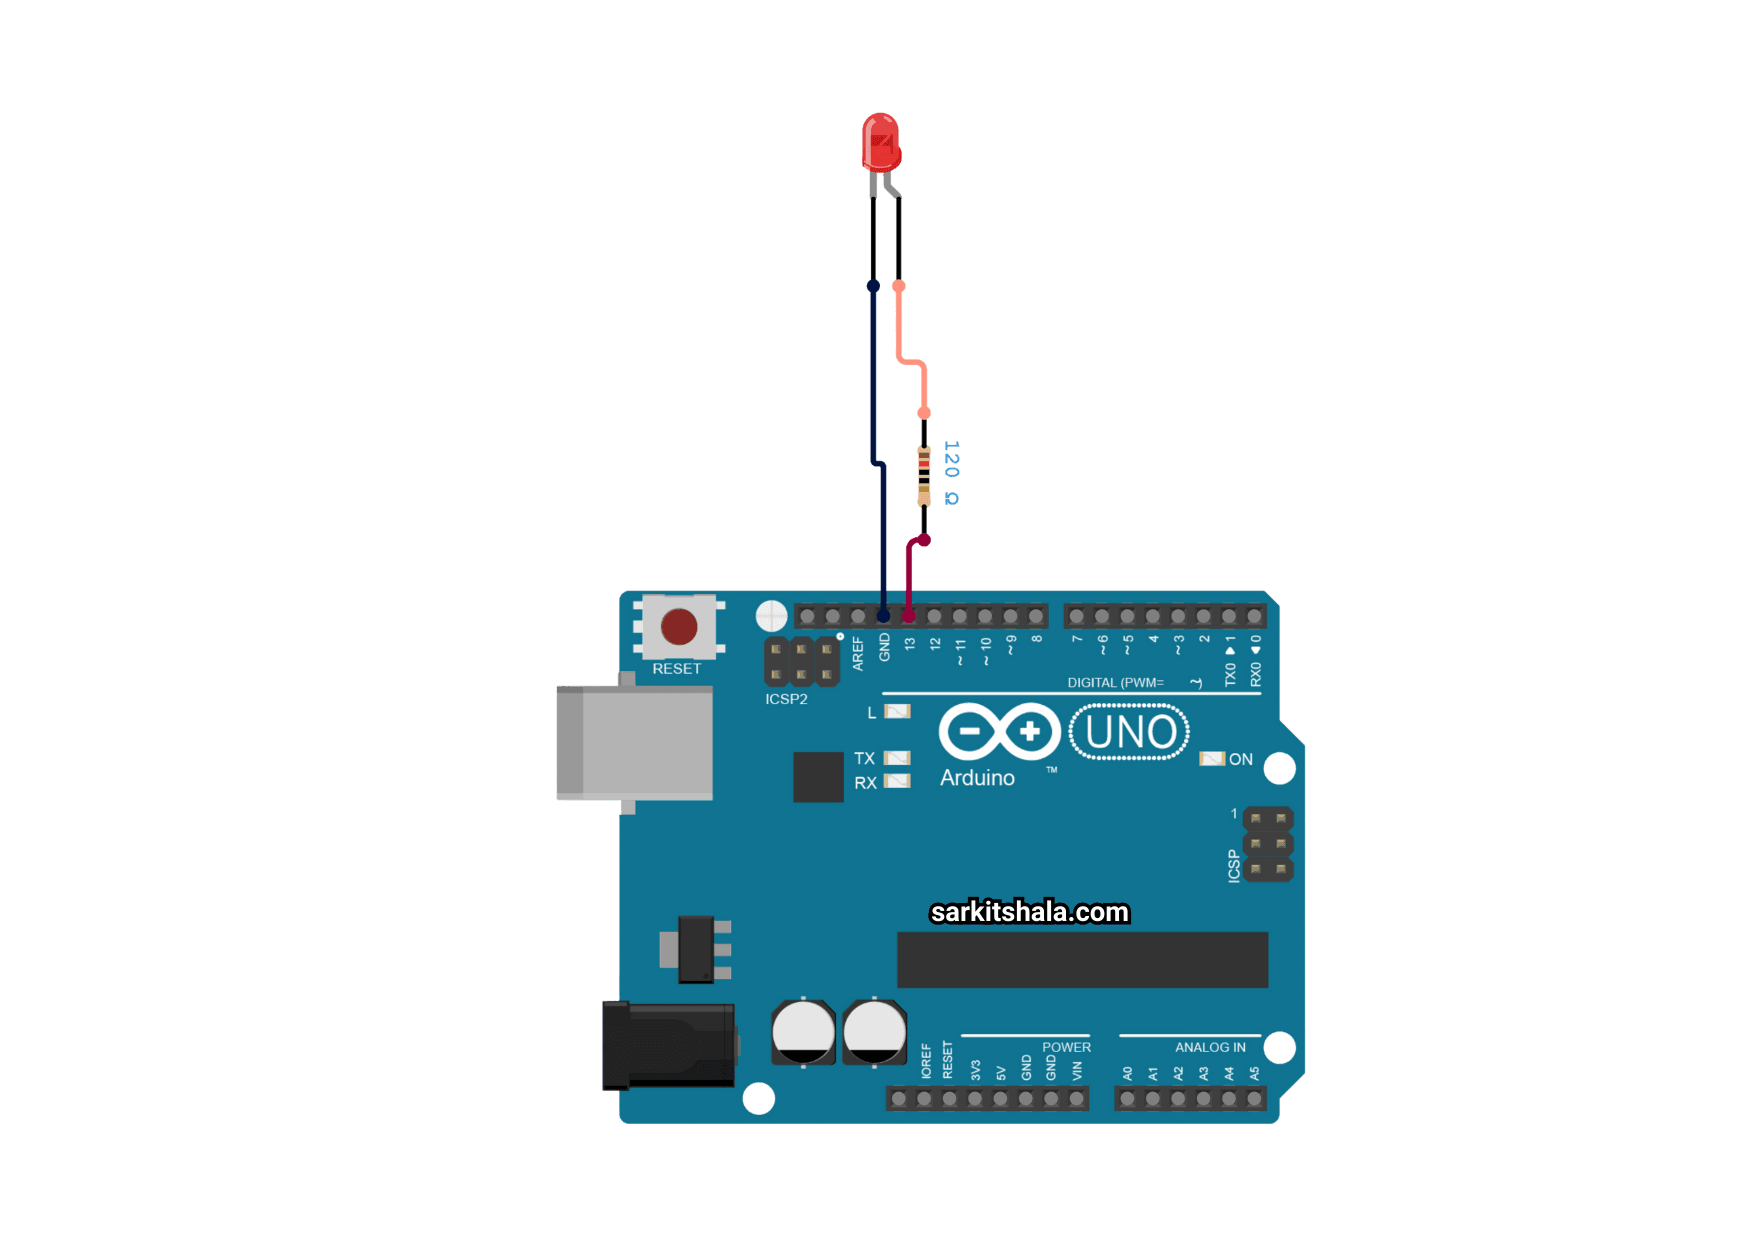
11. Connection Details
| Component | Arduino Pin | Description |
|---|---|---|
| LED Anode (+) | Digital Pin 9 | Supplies voltage to the LED |
| LED Cathode (-) | GND (Ground) | Completes the circuit |
| Resistor (220Ω – 330Ω) | In series with LED | Limits current to prevent LED damage |
12. Algorithm
- Start
- Initialize Arduino and define LED pin
- Set LED pin as OUTPUT in setup() function
- Turn LED ON
- Wait for 1 second (1000ms delay)
- Turn LED OFF
- Wait for 1 second (1000ms delay)
- Repeat steps 4–7 in a loop
Arduino Code: Basic LED Blinking
// Define LED pin
const int ledPin = 9; // LED is connected to digital pin 9

void setup() {
  pinMode(ledPin, OUTPUT); // Set LED pin as an output
}

void loop() {
  digitalWrite(ledPin, HIGH); // Turn LED ON
  delay(1000);                // Wait for 1 second
  digitalWrite(ledPin, LOW);  // Turn LED OFF
  delay(1000);                // Wait for 1 second
}
Explanation of the Code
- Defining the LED Pin:
const int ledPin = 9;assigns pin 9 to control the LED. - Configuring the LED as Output:
pinMode(ledPin, OUTPUT);sets pin 9 as an output. - Turning the LED ON and OFF in a Loop:
digitalWrite()is used to control the state.
Modifying LED Behavior
Adjusting Blink Speed
Modify the delay() value:
- For faster blinking (0.5 seconds ON/OFF):
delay(500); - For slower blinking (2 seconds ON/OFF):
delay(2000);
LED Brightness Control (PWM)
const int ledPin = 9;

void setup() {
  pinMode(ledPin, OUTPUT);
}

void loop() {
  for (int brightness = 0; brightness <= 255; brightness += 5) {
    analogWrite(ledPin, brightness); // Increase brightness
    delay(30);
  }
  for (int brightness = 255; brightness >= 0; brightness -= 5) {
    analogWrite(ledPin, brightness); // Decrease brightness
    delay(30);
  }
}
Applications of LED Interfacing with Arduino
- Status Indicator: Shows device status (ON/OFF).
- Traffic Light System: Simulates red, yellow, and green lights.
- Smart Lighting: Can be controlled using sensors or IoT.
- Notification Systems: Used in alarm systems.
- Pulse & Heartbeat Indicators: Medical applications.
- Automated Signaling: In smart cities and automation.
13. Troubleshooting Common Issues
| Issue | Possible Causes | Solution |
|---|---|---|
| LED does not turn ON | Loose connections, incorrect polarity | Check wiring, ensure LED is in the correct orientation |
| LED is too dim | Resistor value too high | Use a lower resistor (220Ω) |
| LED is not blinking | Code issue, wrong pin | Check code and ensure correct pin is assigned |
| LED turns ON but doesn't turn OFF | Pin not set as OUTPUT | Ensure pinMode(ledPin, OUTPUT); is in setup() |
14. Conclusion
Interfacing an LED with Arduino is a great way to learn digital output control. By controlling the LED using digitalWrite() and analogWrite(), we can create blinking effects, brightness control, and automated lighting systems.