Interfacing Arduino with PIR Sensor

Ever wished your Arduino could act like a tiny security guard who never blinks? Meet the PIR sensor—a clever little gadget that detects motion faster than your cat spots a snack. In this DIY electronics experiment, you'll learn how to interface an Arduino with a PIR (Passive Infrared) sensor to create your very own motion detection system. Whether you're a curious kid or a seasoned tinkerer, this project will show you how a humble sensor can transform ordinary circuits into smart guardians. From spotting sneaky intruders to automating lights, this tutorial makes motion sensing both fun and surprisingly easy. Ready to give your Arduino a sixth sense? Let's get moving!
Objective
To detect motion using a PIR sensor connected to an Arduino.
Theory
- What is PIR Sensor: A Passive Infrared (PIR) sensor detects motion by measuring changes in infrared radiation emitted by warm objects (like humans).
- How Does It Work: The sensor has two slots that detect infrared levels. When motion occurs, the levels change, triggering an output signal.
- Why Use It: Motion detection is used in security systems, automatic lights, and smart home devices.
- Learning Outcome: Understand how to connect, configure, and program an Arduino to detect motion events using a PIR sensor.
Components Required
- Arduino Uno
- Breadboard
- Resistor 220Ω (for LED)
- PIR Motion Sensor Module (HC-SR501)
- Jumper Wires (Male-to-Male) 5-6
- USB Power Cable
- LED (Optional for indication)
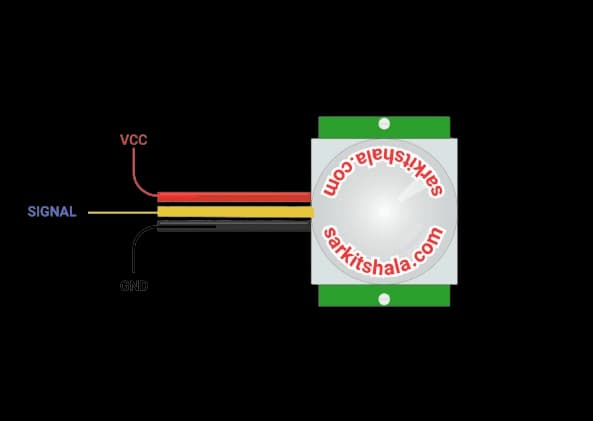
Pin Diagram
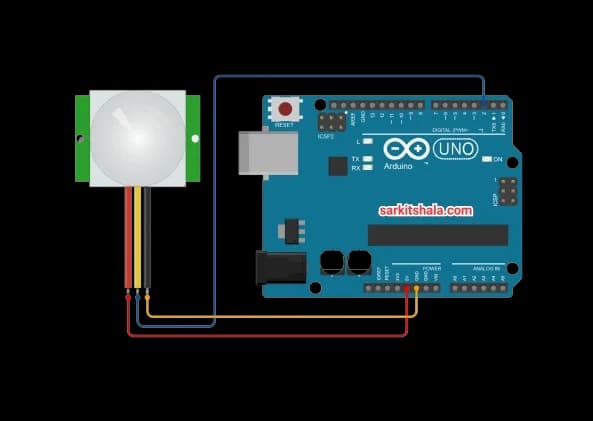
Circuit Diagram
Assembly Steps
- Connect PIR VCC pin to Arduino 5V
- Connect PIR GND to Arduino GND
- Connect PIR OUT to Arduino digital pin 2
- Insert LED anode in pin 13 via 220Ω resistor (optional)
- Connect LED cathode to GND
- Plug in the USB cable
Tip: If the sensor has sensitivity and delay knobs, set them to mid-range for testing.
Arduino Code
1int pirPin = 2;    // PIR sensor output pin
2int ledPin = 13;   // Onboard LED
3
4void setup() {
5  pinMode(pirPin, INPUT);
6  pinMode(ledPin, OUTPUT);
7  Serial.begin(9600);
8  Serial.println("PIR Motion Sensor Test");
9}
10
11void loop() {
12  int motionState = digitalRead(pirPin);
13  if (motionState == HIGH) {
14    Serial.println("Motion Detected!");
15    digitalWrite(ledPin, HIGH);
16  } else {
17    Serial.println("No Motion.");
18    digitalWrite(ledPin, LOW);
19  }
20  delay(500);
21}
Code Explanation
1. Variable Declaration
int pirPin = 2;
pirPin tells the Arduino where the PIR sensor's output is connected — digital pin 2.
int ledPin = 13;
ledPin sets pin 13 to control the onboard LED.
2. setup() Function
1void setup() {
2  pinMode(pirPin, INPUT);
3  pinMode(ledPin, OUTPUT);
4  Serial.begin(9600);
5  Serial.println("PIR Motion Sensor Test");
6}- pinMode(pirPin, INPUT): Sets pin 2 as input for the PIR sensor.
- pinMode(ledPin, OUTPUT): Sets pin 13 as output for the LED.
- Serial.begin(9600): Starts serial communication at 9600 baud.
- Serial.println(...): Prints a test message on startup.
3. loop() Function
1void loop() {
2  int motionState = digitalRead(pirPin);
3  if (motionState == HIGH) {
4    Serial.println("Motion Detected!");
5    digitalWrite(ledPin, HIGH);
6  } else {
7    Serial.println("No Motion.");
8    digitalWrite(ledPin, LOW);
9  }
10  delay(500);
11}- digitalRead(pirPin): Reads the state of the PIR sensor.
- if (motionState == HIGH): Checks if motion is detected.
- digitalWrite(ledPin, HIGH): Turns ON the LED.
- digitalWrite(ledPin, LOW): Turns OFF the LED.
- delay(500): Waits for 500ms before checking again.
Line-by-Line Code Breakdown
| Line | Code | Description |
|---|---|---|
| 1 | int pirPin = 2; | Define PIR sensor pin (digital pin 2). |
| 2 | int ledPin = 13; | Define LED pin (digital pin 13). |
| 3 | void setup() { | Start setup function (runs once at start). |
| 4 | pinMode(pirPin, INPUT); | Set PIR pin as INPUT. |
| 5 | pinMode(ledPin, OUTPUT); | Set LED pin as OUTPUT. |
| 6 | Serial.begin(9600); | Start serial communication at 9600 baud. |
| 7 | Serial.println("PIR Motion Sensor Test"); | Print test message. |
| 8 | } | End of setup function. |
| 9 | void loop() { | Start loop function (repeats forever). |
| 10 | int motionState = digitalRead(pirPin); | Read PIR sensor state. |
| 11 | if (motionState == HIGH) { | Check if motion detected. |
| 12 | Serial.println("Motion Detected!"); | Print motion message. |
| 13 | digitalWrite(ledPin, HIGH); | Turn LED ON. |
| 14 | } else { | If no motion detected... |
| 15 | Serial.println("No Motion."); | Print no motion message. |
| 16 | digitalWrite(ledPin, LOW); | Turn LED OFF. |
| 17 | } | End if-else block. |
| 18 | delay(500); | Wait 500 milliseconds. |
| 19 | } | End loop function. |
Expected Outcome
Once your code is uploaded and the setup powered on:
- Startup: Serial Monitor displays:
PIR Motion Sensor Test - Motion Detected: LED lights up and Serial prints
Motion Detected! - No Motion: LED stays off and Serial prints
No Motion. - Loop: The detection checks run every 500ms continuously.
Troubleshooting
- PIR sensor always HIGH: Adjust sensitivity knob; check connections
- No Serial output: Verify Serial Monitor baud rate (9600)
- LED not lighting: Check resistor and LED orientation
- Random triggers: Reduce sensitivity or shield sensor
Related Experiments
- Use multiple PIR sensors for room coverage
- Connect to a buzzer instead of LED
- Log motion data to an SD card
- Trigger camera capture with motion
Fun Facts about PIR Sensor
- PIR stands for Passive Infrared
- They detect changes in infrared levels, not static heat
- Used in automatic doors and wildlife cameras
Glossary of Terms
- PIR Sensor: Device detecting infrared radiation changes
- VCC: Positive voltage supply
- GND: Ground connection
- Digital Pin: Pin reading HIGH/LOW signal
- Serial Monitor: Tool for viewing text output from Arduino