Interfacing Line Sensor Module with Arduino

Line Sensor Module
A line sensor module is designed to detect the presence of a line (typically black) on a white surface. It is commonly used in line-following robots and automation systems. The module detects the contrast between the line and the surface, sending signals to the Arduino to perform specific actions based on whether the line is detected.
How Line Sensor Works
The line sensor uses infrared light to detect the contrast between the surface and the line. The sensor's light-emitting diode (LED) emits infrared light, which is reflected by the surface. A photodiode then detects the reflected light, and if the reflection differs significantly (e.g., a white surface versus a black line), it triggers a high or low signal.
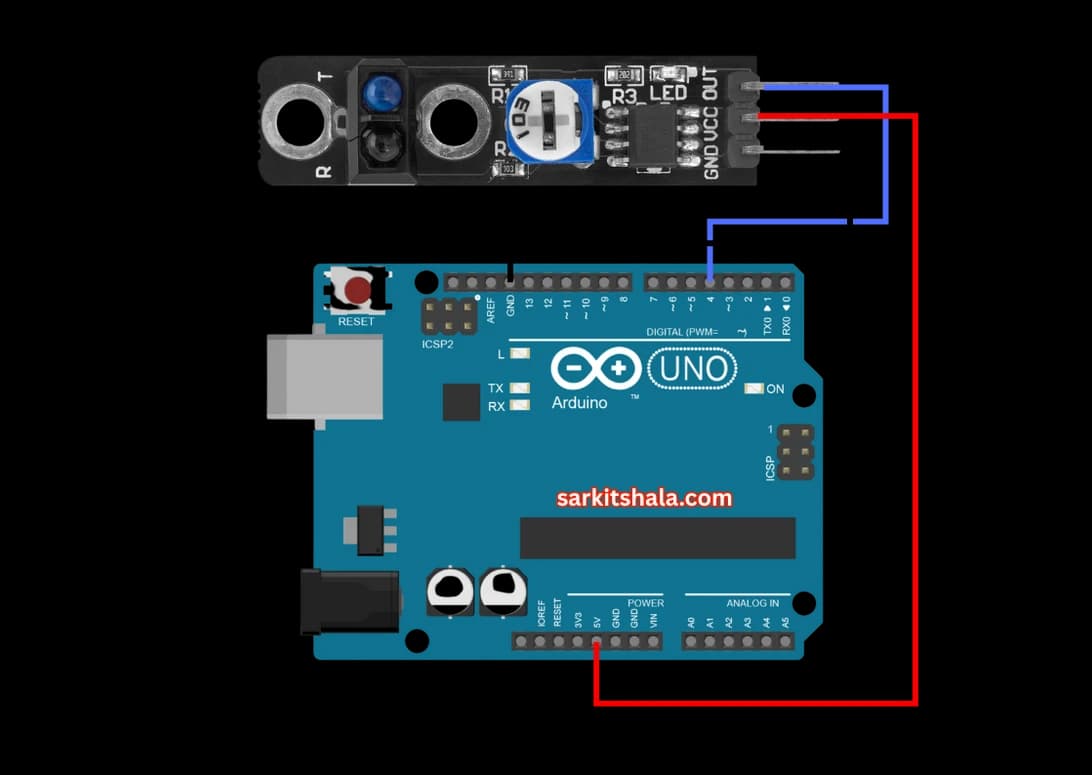
Wiring the Line Sensor Module to Arduino
To wire the line sensor module to Arduino, connect the VCC pin to +5V and the GND pin to ground. The output pin from the sensor should be connected to a digital or analog input pin on the Arduino to detect the line. If using an analog sensor, connect it to an analog pin (e.g., A0); for a digital sensor, use a digital input pin (e.g., D2).
Types of Line Sensors
Analog Line Sensor
- Higher light intensity from the white surface produces a higher analog value.
- Lower light intensity from the black line produces a lower analog value.
Digital Line Sensor
- If the sensor detects the black line, it outputs a LOW signal.
- If the sensor detects the white surface, it outputs a HIGH signal.
Pin Configuration of Line Sensor Module
Line Sensor Module Configuration
- VCC: Connect to +5V on Arduino.
- GND: Connect to GND on Arduino.
- Output Pin: Connect to an analog or digital input pin on Arduino (e.g., A0 or D2).

Algorithm
Initialize Components
- Connect the VCC pin of the line sensor module to +5V and GND to ground.
- Connect the output pin of the sensor to an analog or digital pin on Arduino (e.g., A0 or D2).
Write the Code
- In the setup() function, initialize the serial monitor and set the sensor's output pin as input.
- If using an analog sensor, use analogRead() to read the sensor's value. If using a digital sensor, use digitalRead() to detect HIGH or LOW.
Detect Line Presence
- For analog sensors, compare the value read from analogRead() to a threshold value to detect the line.
- For digital sensors, check if the pin reads HIGH (no line detected) or LOW (line detected).
Control Robot or System
- Use the sensor's output to control a robot or automation system, such as turning motors on/off or changing direction based on line detection.
Repeat or Modify as Needed
- Loop the program to continuously read the sensor and adjust the system's behavior accordingly.
Arduino Code
1// Arduino Line Sensor Module Interface
2// This code reads the digital output of a line sensor to detect black/white surface
3
4const int sensorPin = 2;     // Line sensor output connected to digital pin D2
5const int ledPin = 13;       // LED to indicate detection (built-in LED)
6
7void setup() {
8  pinMode(sensorPin, INPUT);   // Sensor pin as input
9  pinMode(ledPin, OUTPUT);     // LED pin as output
10  Serial.begin(9600);          // Initialize serial monitor
11  Serial.println(\"Line Sensor Module Initialized\");
12}
13
14void loop() {
15  int sensorValue = digitalRead(sensorPin);  // Read sensor output
16
17  if (sensorValue == LOW) {  // Detecting black surface (IR absorbed)
18    Serial.println(\"Black Line Detected\");
19    digitalWrite(ledPin, HIGH);   // Turn on LED
20  } else {
21    Serial.println(\"White Surface Detected\");
22    digitalWrite(ledPin, LOW);    // Turn off LED
23  }
24
25  delay(100); // Small delay for stability
26}
Applications
- Line-following robots
- Maze-solving robots
- Automated assembly lines
- Object tracking
- Path detection in robotic systems
- Smart vehicle navigation systems
Conclusion
Interfacing a line sensor module with Arduino is a vital skill for creating automated systems that require line detection, such as robots or smart vehicles. By detecting the presence or absence of a line, you can control motors, change directions, or trigger other actions, making this sensor ideal for various automation applications.