NVIDIA Jetson Nano Developer Kit
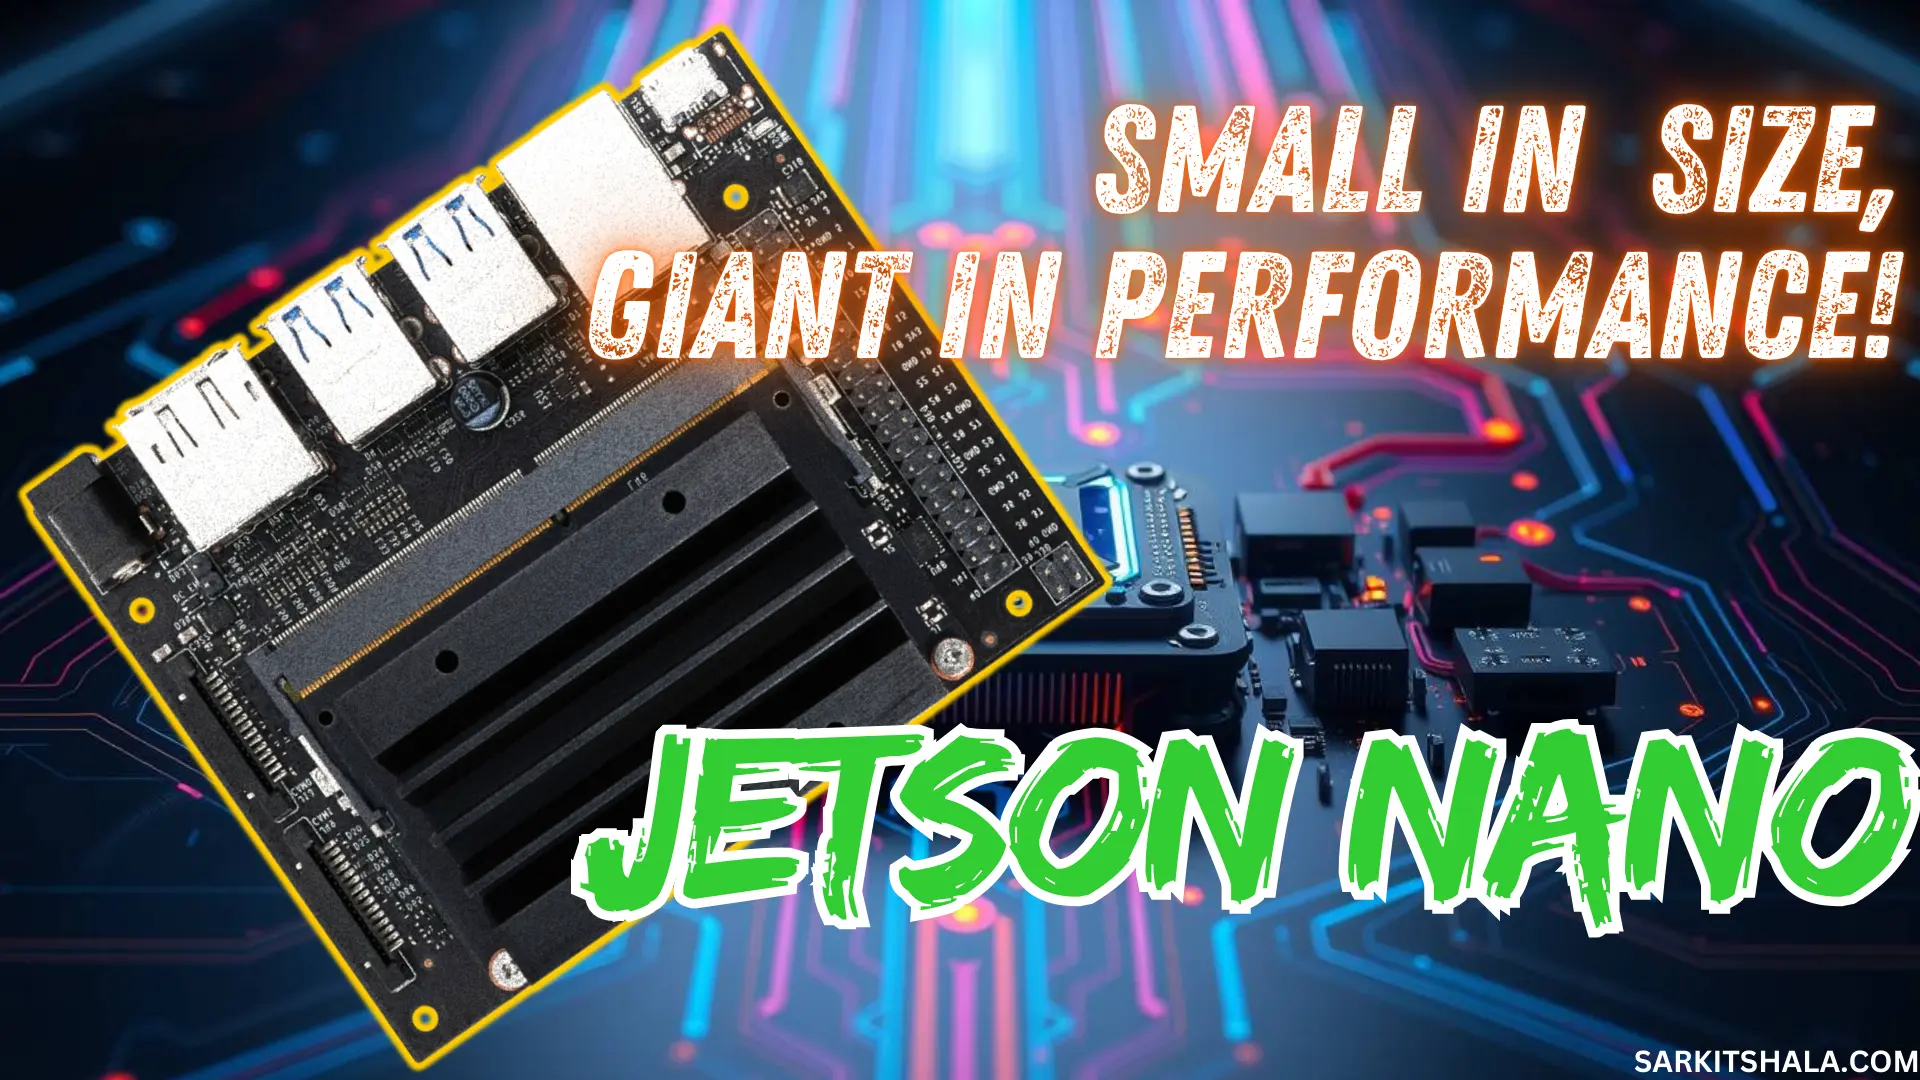
The NVIDIA® Jetson Nano™ Developer Kit is a small AI computer for makers, learners, and developers. After following along with this brief guide, you'll be ready to start building practical AI applications, cool AI robots, and more.
The NVIDIA Jetson Nano Developer Kit is a compact, yet powerful single-board computer (SBC) designed for AI, deep learning, and edge computing applications. It provides GPU acceleration at a low cost and power consumption, making it ideal for robotics, computer vision, IoT, and AI-based embedded systems.
Components Required
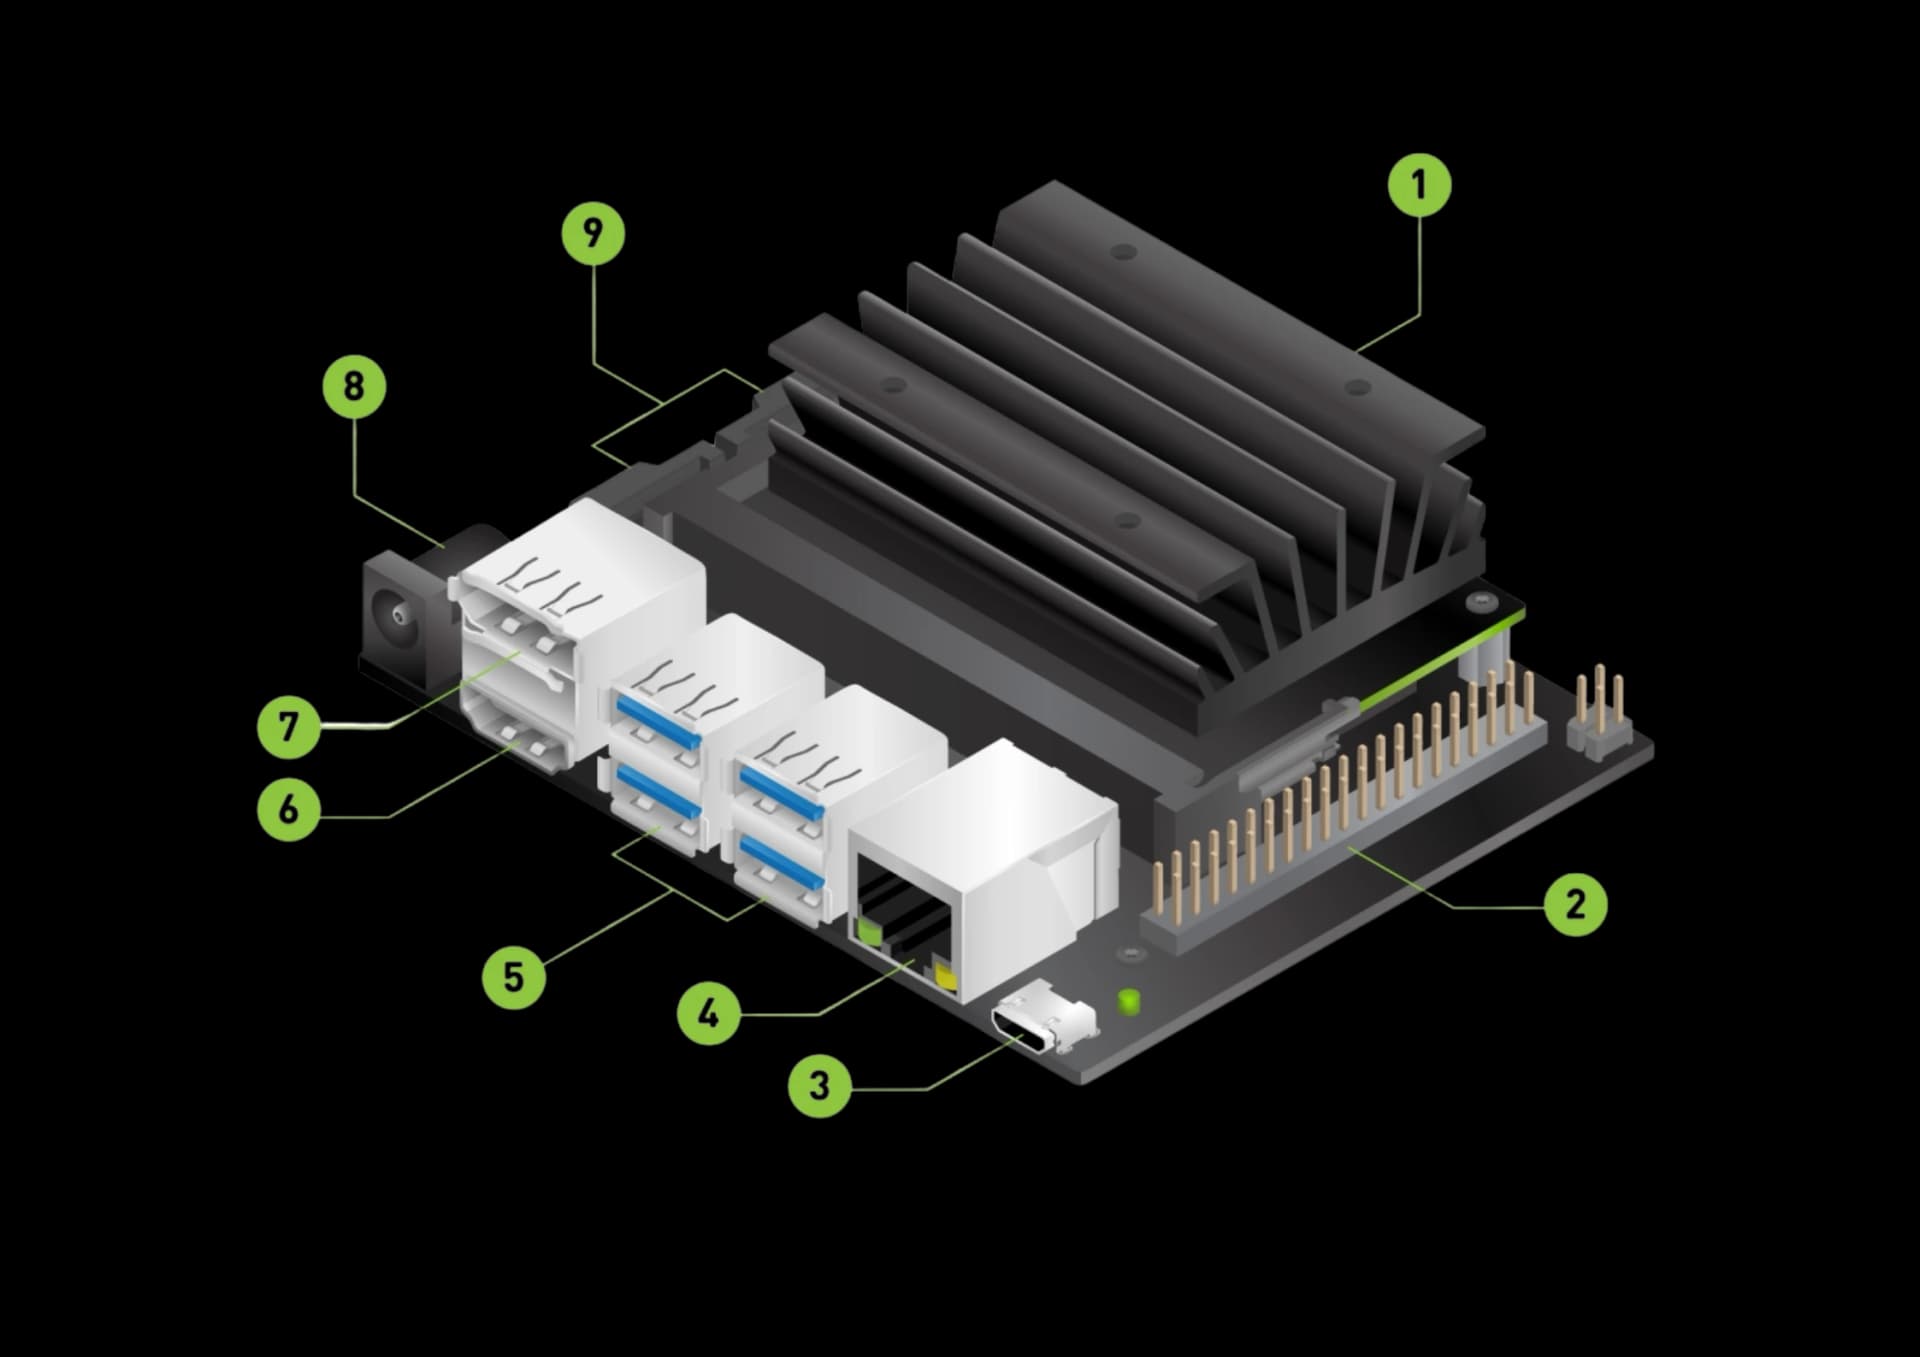
- MicroSD card slot
- 40-pin expansion header
- Gigabit Ethernet port
- USB 3.0 ports
- HDMI output port
- DisplayPort connector
- DC Barrel jack
- MIPI CSI-2 camera connectors
Key Features
1. CUDA-X AI Acceleration: Powered by a 128-core Maxwell GPU, enabling real-time AI inference.
2. Quad-Core CPU: ARM Cortex-A57 processor for efficient multi-threaded computing.
3. 4GB RAM: 4GB LPDDR4 memory, providing smooth performance for AI applications.
4. Expandable Storage: Supports microSD cards (recommended 32GB or more) and M.2 Key E slot for additional storage or connectivity modules.
5. Low Power Consumption: Runs on 5W to 10W, making it energy-efficient for edge AI.
6. Linux-based OS: Runs Ubuntu-based JetPack SDK, which includes TensorRT, CUDA, cuDNN, OpenCV, and other AI libraries.
7. Multiple Interfaces: Features USB, GPIO, I2C, UART, SPI, and MIPI CSI for sensors and cameras.
Technical Specifications
| Category | Specification |
|---|---|
| CPU | Quad-core ARM Cortex-A57 |
| GPU | NVIDIA Maxwell architecture, 128 CUDA cores |
| Memory | 4GB LPDDR4 |
| Storage | microSD card (not included) |
| Connectivity | 1x Gigabit Ethernet, M.2 Key E for Wi-Fi/BT |
| USB Ports | 4x USB 3.0, 1x Micro-USB (power and data) |
| Display | HDMI 2.0, DisplayPort |
| Camera | MIPI CSI-2 (supports Raspberry Pi Camera Module) |
| I/O Pins | 40-pin GPIO header (compatible with Raspberry Pi HATs) |
| Power Input | 5V/4A (barrel jack) or 5V/2.5A (micro-USB) |
| Power Modes | 5W and 10W modes |
| OS Support | Ubuntu-based NVIDIA JetPack |
Technical Specifications
Jetson Nano Developer Kit Components
- Jetson Nano module (contains CPU, GPU, RAM, and storage interfaces).
- Carrier Board (provides I/O ports, camera interfaces, and power management).
- MicroSD slot for bootable OS.
- GPIO Header (40-pin) for connecting sensors and actuators.
- Ethernet Port (Gigabit LAN) for networking.
- USB 3.0 Ports for peripherals like keyboards, mice, and external storage.
The Jetson Nano Developer Kit consists of:
JetPack SDK - The Software Powerhouse
- CUDA - GPU computing platform for AI acceleration.
- cuDNN - Deep learning acceleration library.
- TensorRT - High-performance inference optimizer.
- OpenCV - Computer vision and image processing.
- Python, C++, and Deep Learning Frameworks (PyTorch, TensorFlow, Keras).
Power Supply Options
- Micro-USB (5V/2.5A) for basic tasks.
- Barrel Jack (5V/4A) for high-power applications like AI and robotics.
- Power Mode Selection:
- 5W Mode (default, low power consumption).
- 10W Mode (higher performance for AI tasks).
Camera Support
- MIPI CSI Camera: Supports Raspberry Pi Camera Module v2.
- USB Cameras: Compatible with standard webcams.
- Multiple Camera Support: With additional modules, multiple cameras can be connected for advanced vision-based applications.
Connectivity & Expansion
- 40-Pin GPIO Header: Supports sensors, buttons, LEDs, and other peripherals.
- I2C, UART, SPI, PWM: Interfaces for external devices.
- M.2 Slot (Key E): Supports Wi-Fi, Bluetooth, and NVMe storage.
Performance & AI Capabilities
| Benchmark | Performance |
|---|---|
| ResNet-50 Inference | 472 FPS |
| SSD-Mobilenet-v2 | 47 FPS |
| YOLOv4 Tiny Object Detection | 24 FPS |
| Jetson Inference Library | Supports real-time AI vision |
Applications
- AI & Deep Learning: Run real-time computer vision and neural networks.
- Edge Computing: Process AI models locally without cloud dependency.
- Robotics: Integrate with ROS (Robot Operating System) for autonomous navigation.
- Smart Surveillance: AI-powered face recognition, object detection, and tracking.
- IoT & Smart Devices: Collect and analyze IoT sensor data.
- Autonomous Vehicles & Drones: AI-based navigation and obstacle avoidance.
Jetson Nano vs. Raspberry Pi 4
| Feature | Jetson Nano | Raspberry Pi 4 |
|---|---|---|
| GPU | 128-core Maxwell | Broadcom VideoCore VI |
| CPU | Quad-core ARM Cortex-A57 | Quad-core Cortex-A72 |
| RAM | 4GB LPDDR4 | 2GB/4GB/8GB LPDDR4 |
| AI Support | TensorRT, CUDA | No AI acceleration |
| Performance | AI-optimized, better ML processing | Good for general computing |
| Power Consumption | 5W - 10W | 3W - 7W |
Jetson Nano is AI-focused, while Raspberry Pi is better for general computing and hobbyist projects.
Getting Started
- Step 1: Download & Flash JetPack OS
- Download JetPack (Ubuntu-based OS) from NVIDIA's official site.
- Use Etcher or Raspberry Pi Imager to flash it to a microSD card.
- Insert the microSD into Jetson Nano and power it up.
- Step 2: Set Up Development Environment
- Python + Jetson.GPIO for hardware control.
- PyTorch, TensorFlow, OpenCV for AI projects.
- Jupyter Notebook for prototyping AI models.
- Step 3: Connect to Display, Keyboard, and Mouse
- Use HDMI/DP for display and connect peripherals.
- Enable SSH/VNC for remote access.
In Details
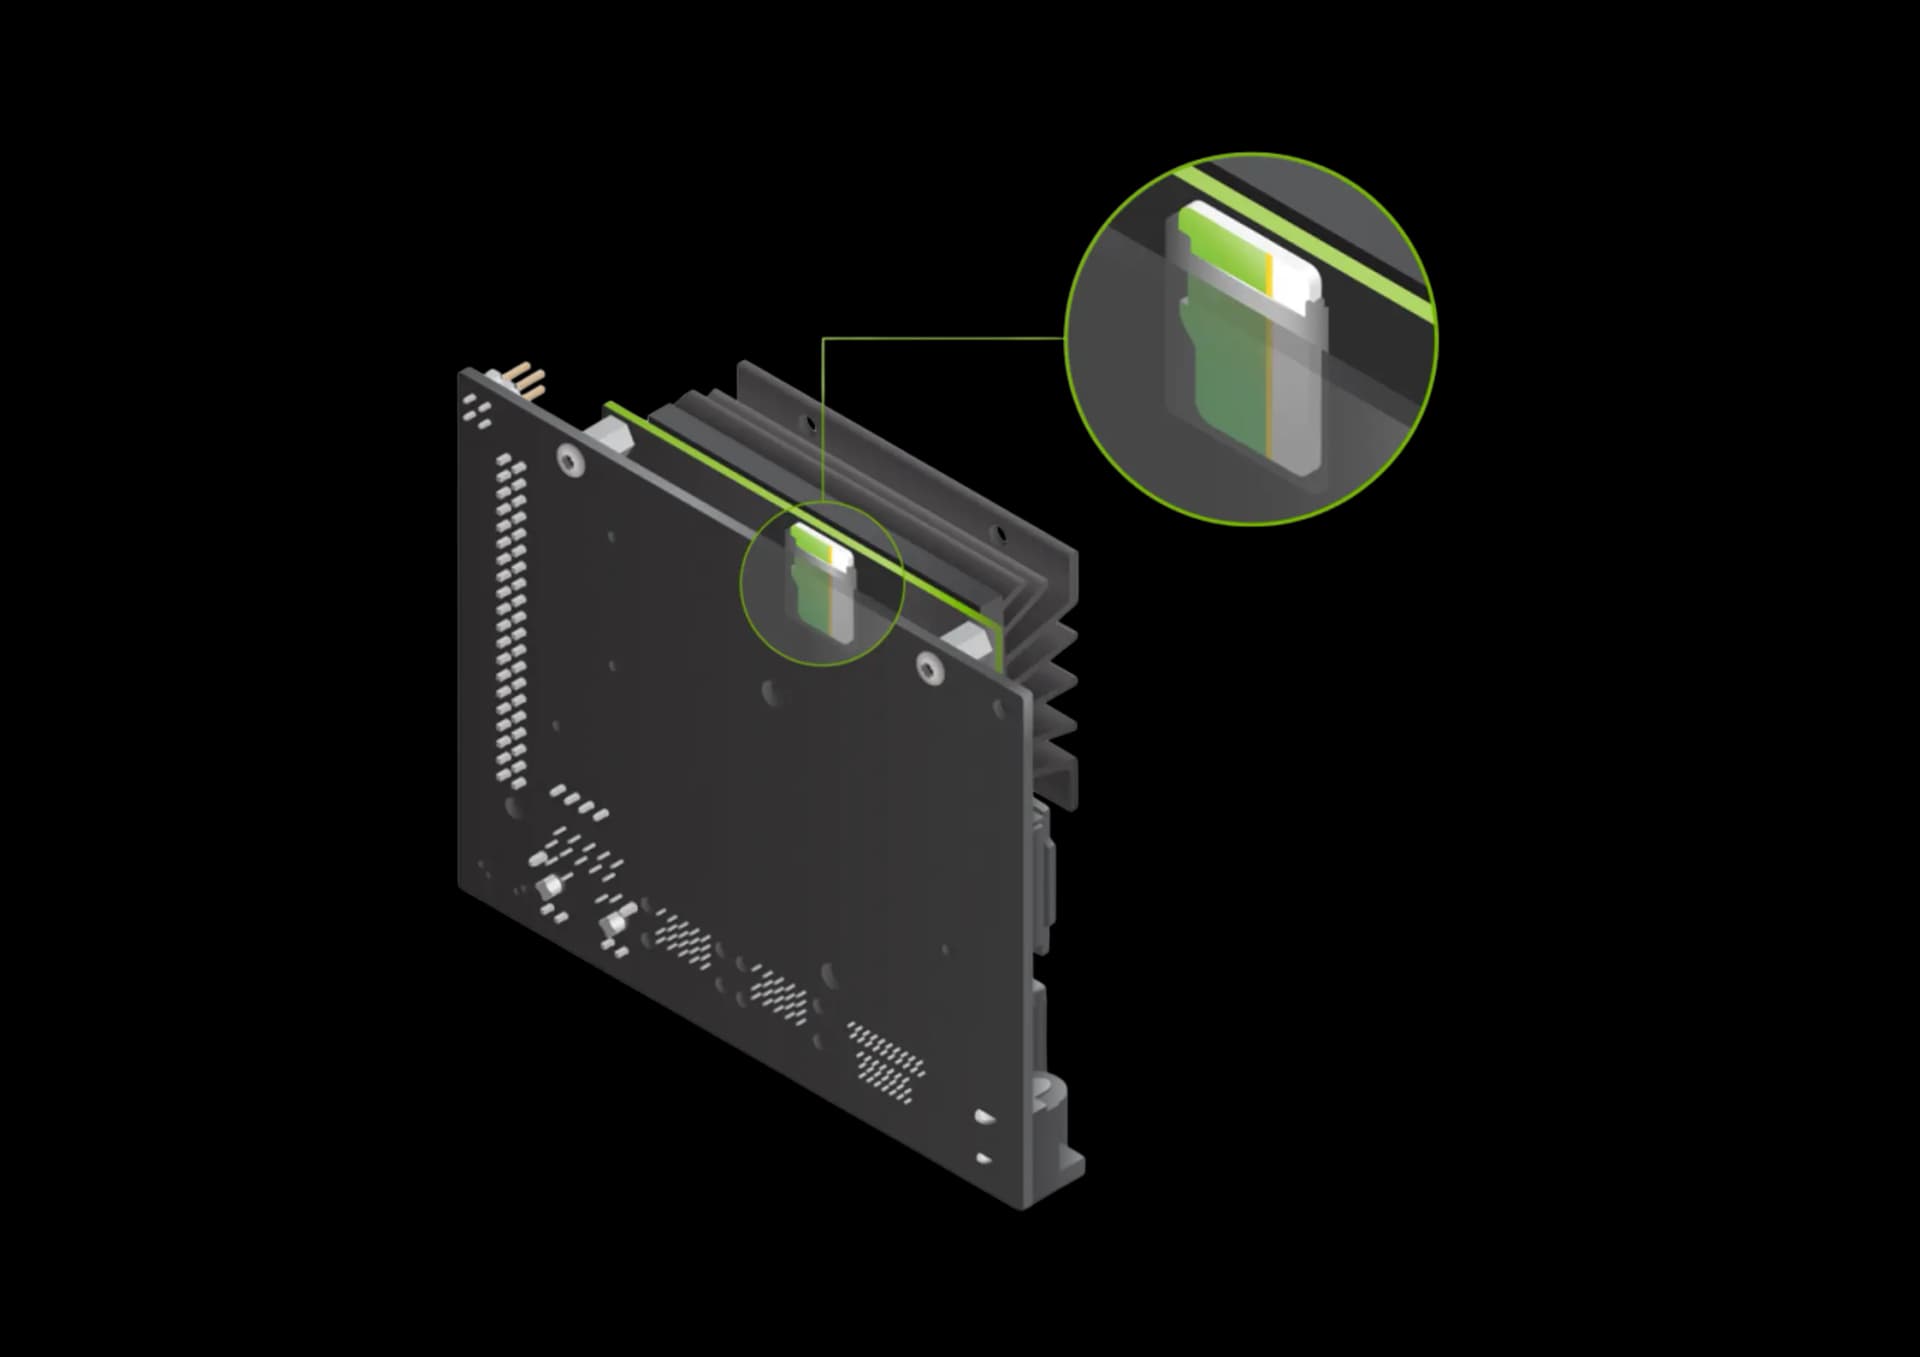
MicroSD Card
- The Jetson Nano Developer Kit uses a microSD card as a boot device and for main storage. It's important to have a card that's fast and large enough for your projects; the minimum recommended is a 32 GB UHS-1 card.
- See the instructions below to flash your microSD card with operating system and software.
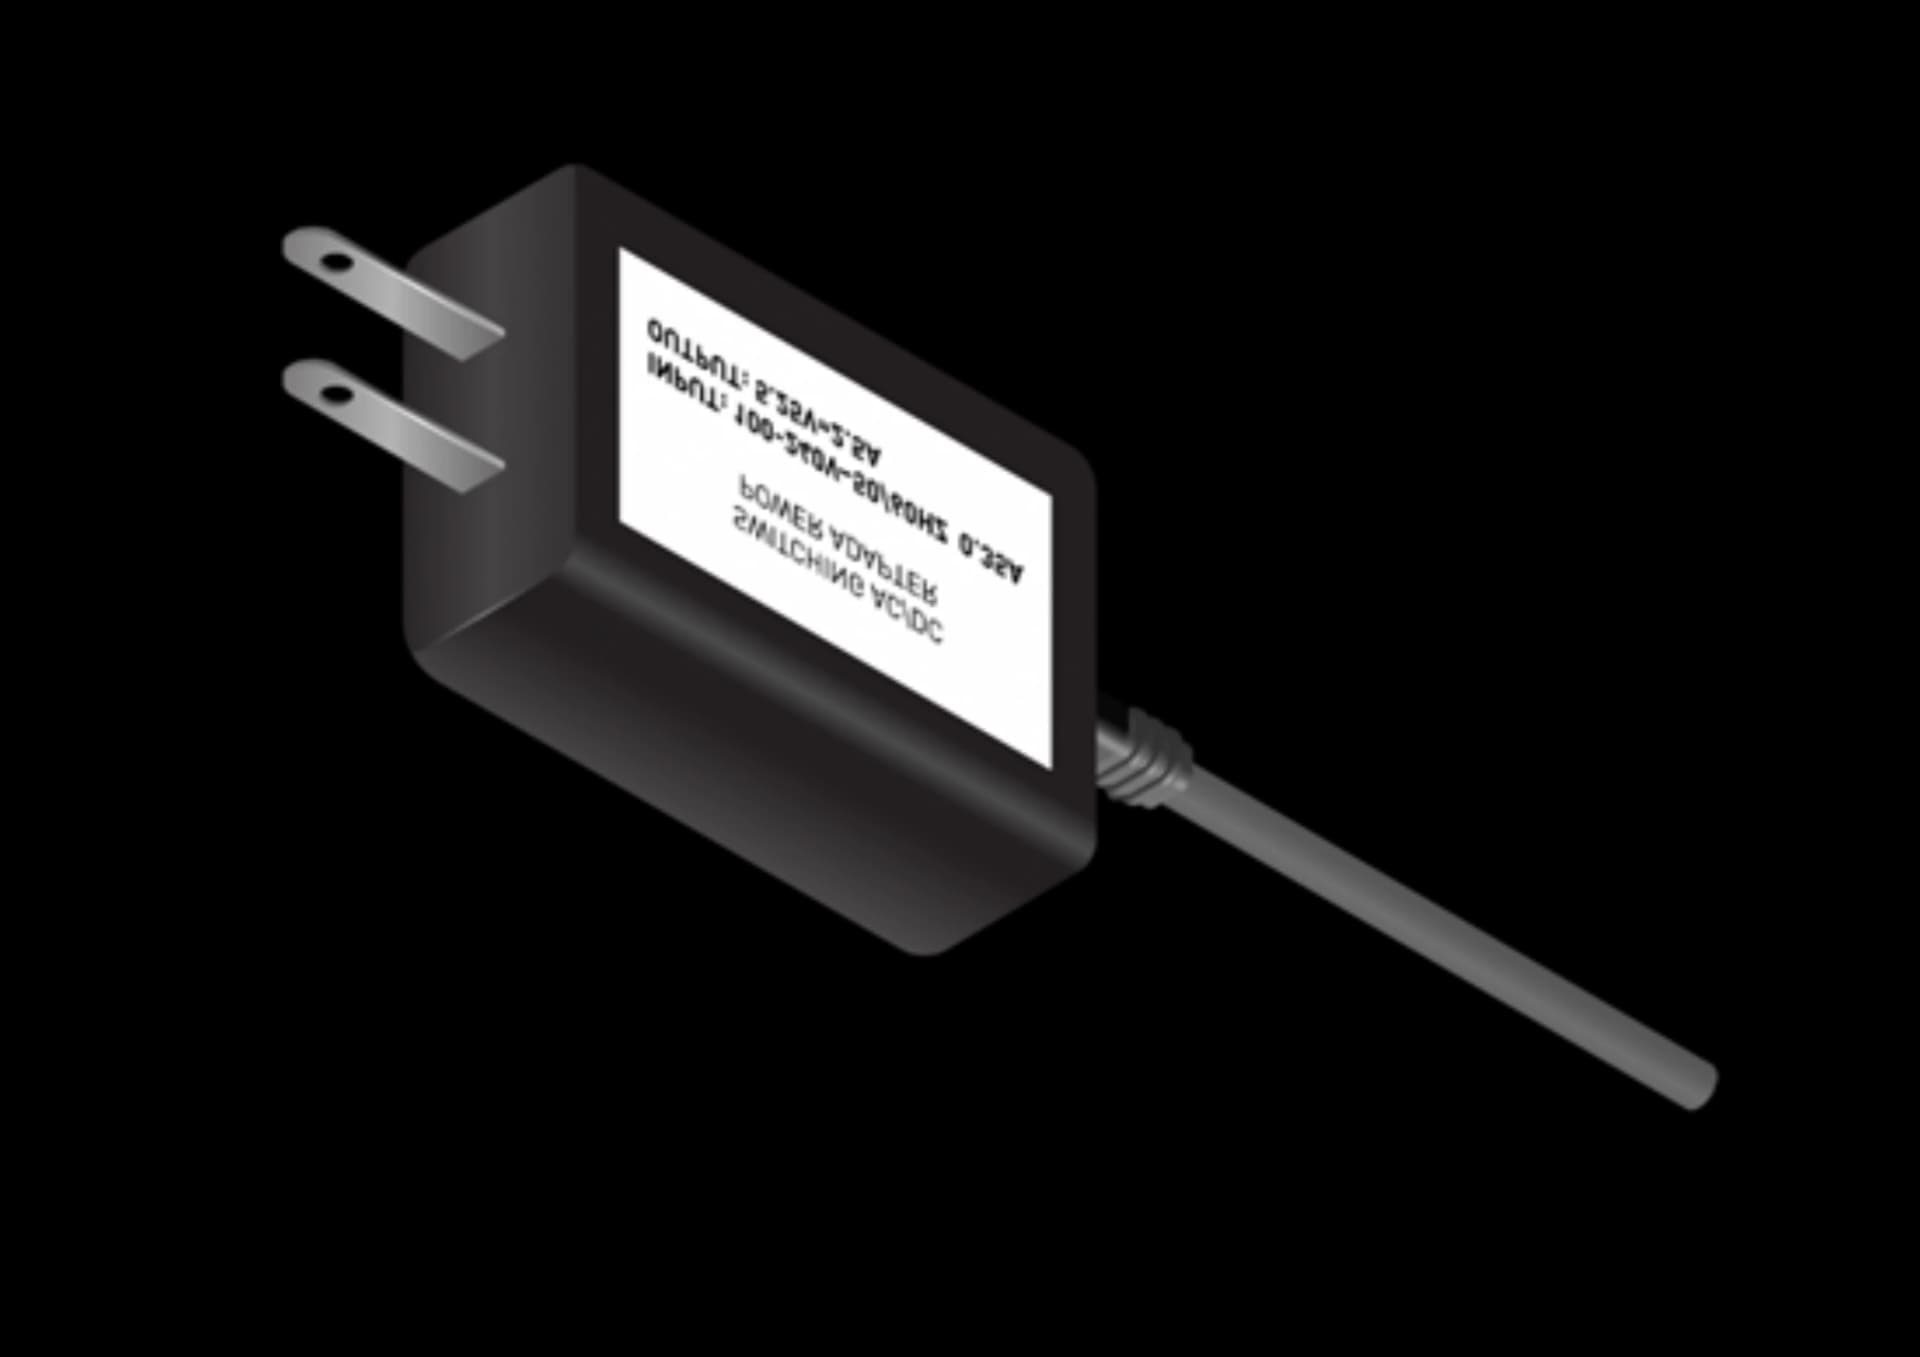
Micro-USB Power Supply
- You'll need to power the developer kit with a good quality power supply that can deliver 5V⎓2A at the developer kit's Micro-USB port. Not every power supply promising “5V⎓2A” will actually do this.
- As an example of a good power supply, NVIDIA has validated Adafruit's 5V 2.5A Switching Power Supply with 20AWG MicroUSB Cable (GEO151UB-6025). It was specifically designed to overcome common problems with USB power supplies; see the linked product page for details.
Note
- The stated power output capability of a USB power supply can be seen on its label.
- Actual power delivery capabilities of USB power supplies do vary. Please see the Jetson Nano Developer Kit User Guide for additional information.
Write Image to the microSD Card
To prepare your microSD card, you'll need a computer with Internet connection and the ability to read and write SD cards, either via a built-in SD card slot or adapter.
- Download the Jetson Nano Developer Kit SD Card Image, and note where it was saved on the computer.
- Write the image to your microSD card by following the instructions below according to your computer's operating system: Windows, macOS, or Linux.
Instructions for Windows
Format and Write Image to microSD Card

- Select card drive.
- Select 'Quick format'.
- Leave 'Volume label
- Click 'Format' to start formatting, and 'Yes' on the warning dialog.
Download, install, and launch SD Memory Card Formatter for Windows.
Use Etcher to write the Jetson Nano Developer Kit SD Card Image to your microSD card
- Download, install, and launch Etcher.
- Click “Select image” and choose the zipped image file downloaded earlier.
- Insert your microSD card if not already inserted. Click Cancel (per this explanation) if Windows prompts you with a dialog like this:
- Click “Select drive” and choose the correct device.
- Click “Flash!” It will take Etcher about 10 minutes to write and validate the image if your microSD card is connected via USB3.
- "After Etcher finishes, Windows may let you know it doesn't know how to read the SD Card. Just click Cancel and remove the microSD card..
- After your microSD card is ready, proceed to set up your developer kit.


Instructions for MacOS
You can either write the SD card image using a graphical program like Etcher, or via command line.
Etcher Instructions
- Do not insert your microSD card yet.
- Download, install, and launch Etcher.
- Click 'Select image' and choose the zipped image file downloaded earlier.
- Insert your microSD card. Click Ignore if your Mac shows this window.
- "If you have no other external drives attached, Etcher will automatically select the microSD card as target device. Otherwise, click 'Select drive' and choose the correct device.
- Click 'Flash!' Your Mac may prompt for your username and password before it allows Etcher to proceed.
- After Etcher finishes, your Mac may let you know it doesn't know how to read the SD Card. Just click Eject and remove the microSD card.


It will take Etcher about 10 minutes to write and validate the image if your microSD card is connected via USB3.

Command Line Instructions
- Do not insert your microSD card yet. Waiting will help you discover correct disk device name in steps below.
- Open the Terminal app.
- Use this command to list any external disk devices already attached to your Mac: diskutil list external | fgrep '/dev/disk'.
- For example, if you already have a USB drive attached to your Mac, the result will look similar to this.
- Insert your microSD card. Click Ignore if your Mac shows this window.
- Use this command to remove any existing partitions from the microSD card, ensuring MacOS will let you write to it. BE VERY CAREFUL to specify the correct disk device: sudo diskutil partitionDisk /dev/disk<n> 1 GPT 'Free Space' '%noformat%' 100%.
- Use this command to write the zipped SD card image to the microSD card. Note the use of /dev/rdisk instead of /dev/disk: /usr/bin/unzip -p ~/Downloads/jetson_nano_devkit_sd_card.zip | sudo /bin/dd of=/dev/rdisk<n> bs=1m.
For example: - There will be no indication of progress (unless you signal with CTRL-t). When the dd command finishes, your Mac will let you know it cannot read the microSD card. Just click Eject.


After your microSD card is ready, proceed to set up your developer kit.
Instructions for Linux
- You can either write the SD card image using a graphical program like Etcher, or via command line.
Etcher Instructions
- Download, install, and launch Etcher.
- Click 'Select image' and choose the zipped image file downloaded earlier.
- Insert your microSD card. If you have no other external drives attached, Etcher will automatically select the microSD card as target device. Otherwise, click 'Change' and choose the correct device.
- Click 'Flash!' Your OS may prompt for your username and password before it allows Etcher to proceed.
- After Etcher finishes, eject the SD Card using Files application.
- Physically remove microSD card from the computer.


It will take Etcher 10-15 minutes to write and validate the image if your microSD card is connected via USB3.

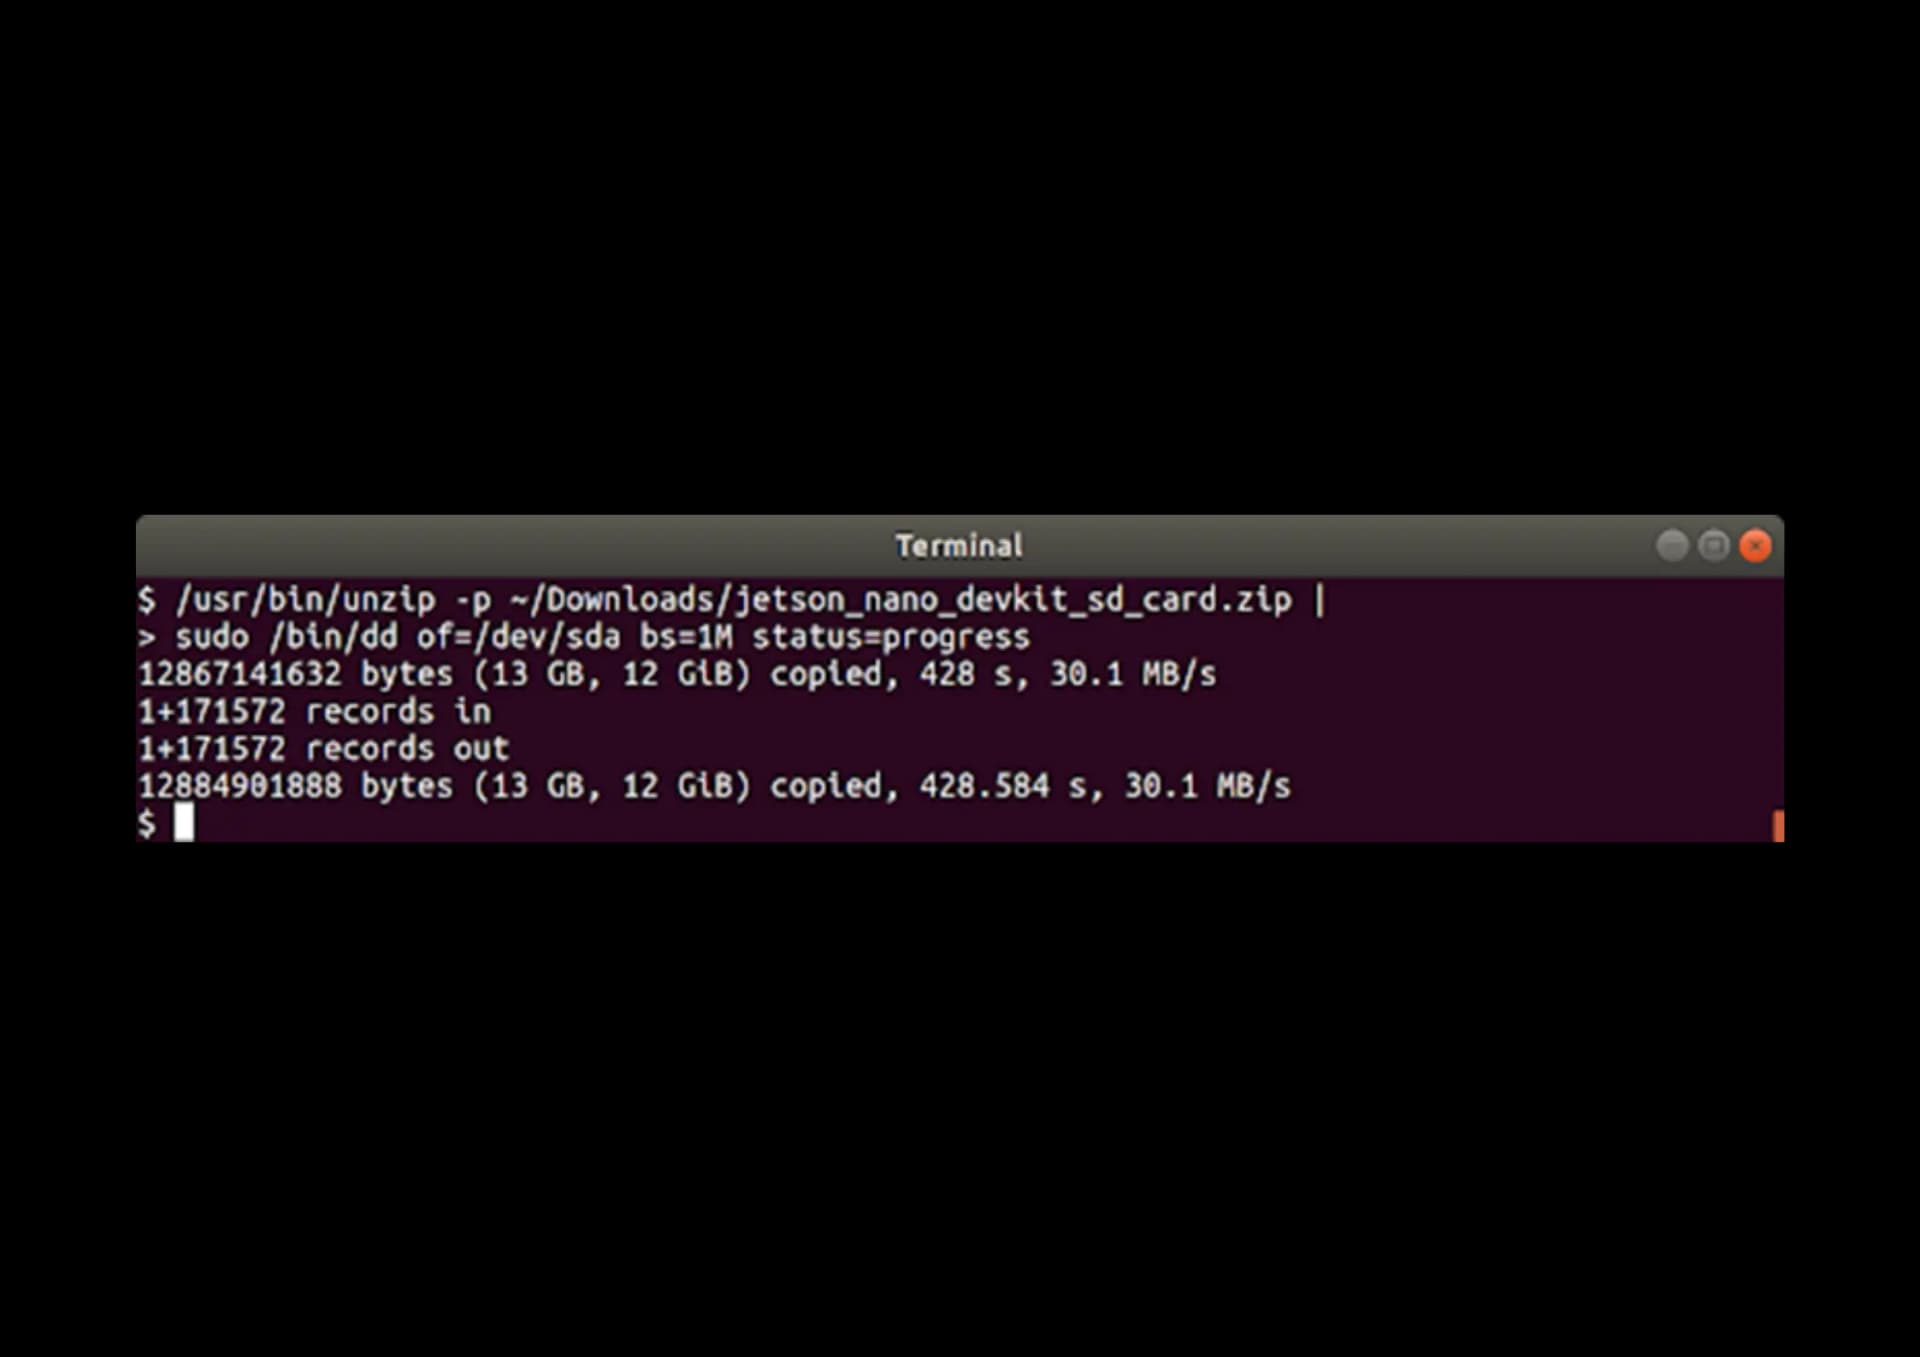
Command Line Instructions
- Open the Terminal application by pressing Ctrl + Alt + T.
- Insert your microSD card, then use a command like this to show which disk device was assigned to it:
- Use this command to write the zipped SD card image to the microSD card
- Physically remove microSD card from the computer.
- After your microSD card is ready, proceed to Setup your developer kit.
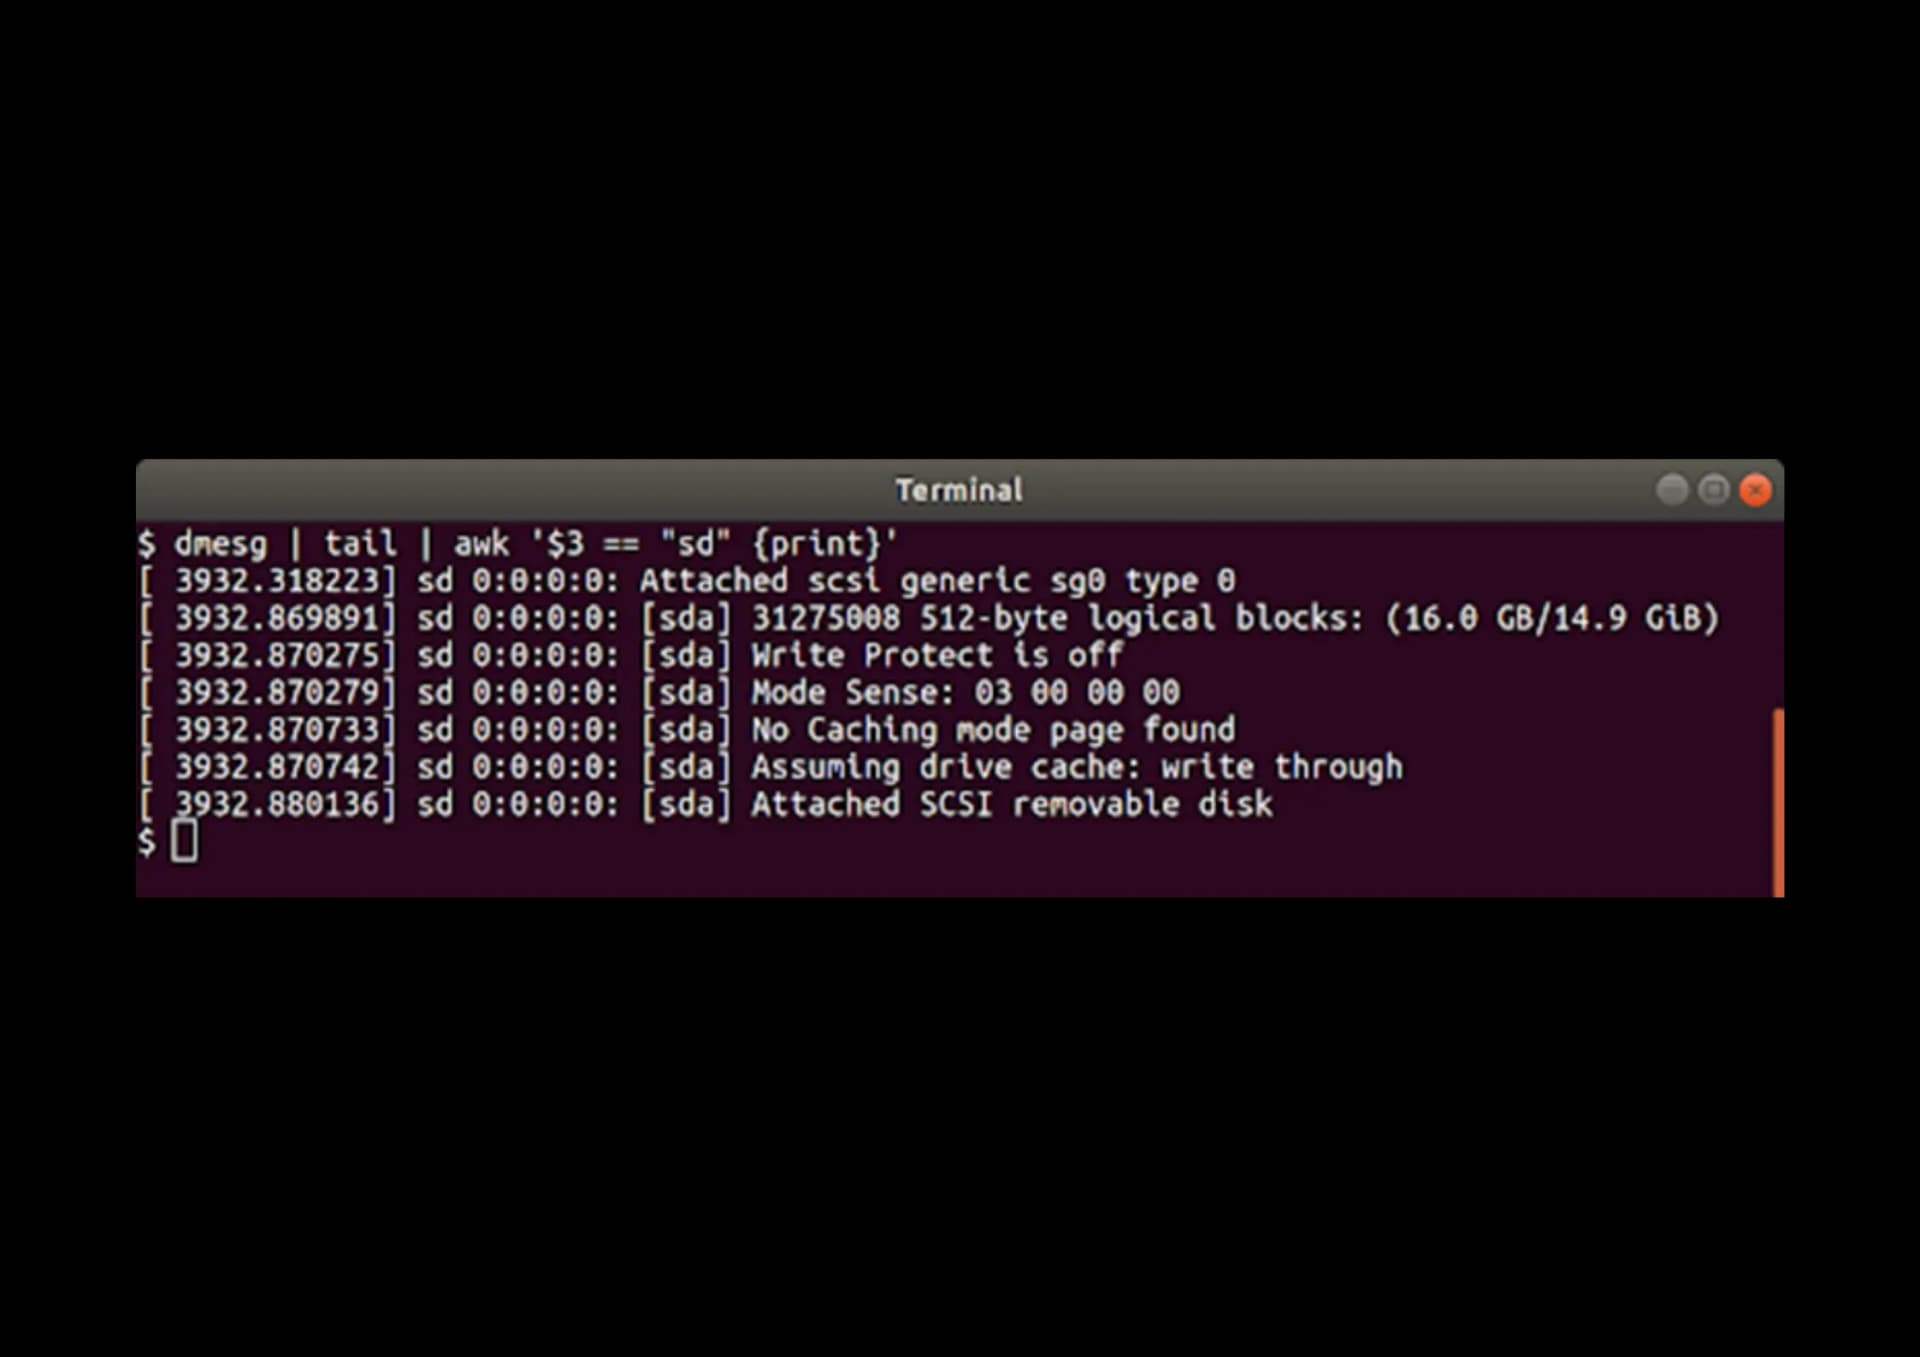
dmesg | tail | awk '$3 == "sd" {print}'
In this example, we can see the 16GB microSD card was assigned /dev/sda.
/usr/bin/unzip -p ~/Downloads/jetson_nano_devkit_sd_card.zip | sudo /bin/dd of=/dev/sd<x> bs=1M status=progress
For Example:
When the dd command finishes, eject the disk device from the command line:
sudo eject /dev/sd'<x>'
Setup and First Boot
There are two ways to interact with the developer kit:
1 with display, keyboard and mouse attached, or
2 in 'headless mode' via connection from another computer.
You can conduct the initial setup either way.
| Feature | With Display | Headless Mode |
|---|---|---|
| Monitor, Keyboard & Mouse | Required | Not Required |
| Extra Computer | Not Required | Required |
| Power Options | Either Micro-USB or DC Power Supply | DC Power Supply Needed |
Initial Setup with Display Attached
Setup Steps
- Unfold the paper stand and place inside the developer kit box.
- Insert the microSD card (with system image already written to it) into the slot on the underside of the Jetson Nano module.
- Set the developer kit on top of the paper stand.
- Power on your computer display and connect it.
- Connect the USB keyboard and mouse.
- Connect your Micro-USB power supply (or see the Jetson Nano Developer Kit User Guide for details about using a DC power supply with a barrel jack connector). The developer kit will power on and boot automatically.
First Boot
A green LED next to the Micro-USB connector will light as soon as the developer kit powers on. When you boot the first time, the developer kit will take you through some initial setup, including:
- Review and accept NVIDIA Jetson software EULA.
- Select system language, keyboard layout, and time zone.
- Create username, password, and computer name.
- Select APP partition size — it is recommended to use the max size suggested.
After Logging In
You will see this Screen. Congratulations!
Initial Setup Headless Mode!
- To complete setup when no display is attached to the developer kit, you]ll need to connect the developer kit to another computer and then communicate with it via a terminal application (e.g., PuTTY) to handle the USB serial communication on that other computer.
- Note: Headless initial configuration requires the developer kit to be powered by a DC power supply with a barrel jack connector, since the Micro-USB port is required to access the initial configuration prompts.
Setup Steps
- Unfold the paper stand and place inside the developer kit box.
- Insert the microSD card (with system image already written to it) into the slot on the underside of the Jetson Nano module.
- Set the developer kit on top of the paper stand..
- "Check the Jetson Nano Developer Kit User Guide for location of J48 Power Select Header and J25 Power Jack.
- Jumper the J48 Power Select Header pins.
- Connect your other computer to the developer kit's Micro-USB port.
- "Connect a DC power supply to the J25 Power Jack. The developer kit will power on automatically.
- Allow 1 minute for the developer kit to boot.
- On your other computer, use the serial terminal application to connect via host serial port to the developer kit.
Conclusion
- Affordable AI Development Platform: Ideal for beginners and professionals in AI, robotics, and IoT.
- Compact & Efficient: Runs deep learning models efficiently at the edge.
- Flexible & Expandable: Supports multiple sensors, cameras, and computing peripherals.
- Powerful GPU for AI Tasks: Handles real-time object detection, facial recognition, and autonomous applications.
- Perfect for AI/ML enthusiasts, students, researchers, and embedded system developers! 🚀